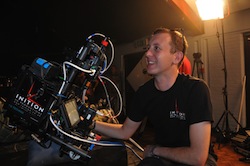
3D on a budget – Andy Millns, director of production and equipment supply company Inition, explains the essential nuts and bolts of 3D acquisition.
The equipment needed to shoot excellent quality live action 3D is available now. However, the complexity and cost of current 3D camera technology can make it a big undertaking for smaller productions and those on a low budget.
Mention 3D production and talk quickly turns to rigs, an essential and much debated part of the set up. There are two basic rig designs for stereoscopic camera pairs; the side-by-side (parallel) and mirror (beam-splitter) rig. The latter, a necessary piece of kit, is generally more complicated, expensive and bulky. Most shoots would use a combination of both.
In addition to the 3D rigs, several other pieces of kit are usually needed to turn what are essentially two 2D cameras (never designed to shoot 3D) into a complete 3D camera system. These include time-code generators, genlocking devices, 3D monitoring, motors and 3D controllers for rig and synchronous lens control, 3D-enabled recording systems, the list goes on. These additional items can make the complete 3D camera an expensive and complicated option compared to a standard 2D rig.
For the ENG-style end of the market a more feasible option could be a camera designed from the ground-up to work in 3D. Panasonic has recently announced such a camera [see February issue page 3], an integrated P2-style twin-lens 3D model that doesn’t require the extra kit and is simple to use. Although a step in the right direction, these integrated cameras will have serious limitations due to the fixed interaxial distance – sticking two lenses 65mm apart (the average human eye distance) on a single camera body is the 3D equivalent of shooting with a fixed-focus lens.
Judging depth
The interaxial distance, a measurement of the spacing between the optical axes of the lenses, is a key factor in determining how and if a 3D shot will work — it is the ‘volume’ control on your 3D. Too much and a shot will be eye-twistingly unusable, too little and you might as well be shooting in 2D. Unfortunately the perfect interaxial distance is not a fixed constant because it depends on focal length and near and far subject distances and can vary wildly from shot to shot. For example, on a recent wildlife shoot in Africa, we required interaxial distances ranging from 2mm (for macro work) up to 25 metres (for wide distant scenics), extremes that would not be possible with a single-body fixed-interaxial camera.
Thankfully it’s not necessary to get a calculator out for every shot. 3D-enabled monitoring enables you to interactively adjust the interaxial to find the distance that makes the shot work both technically and creatively. That’s not to say in drama, for example, the Panasonic camera could work for a wide range of shots, but only if DPs are willing to accept the limitations.
A versatile camera for shooting drama would allow for interaxial distances of around 10mm for close-ups to say 80mm for wides. To achieve this range of interaxial distance, the only current option is a mirror rig, as even the smallest mini-camera bodies are wider than 10mm and therefore won’t be close enough together in a side-by-side configuration. A mirror-rig allows you to achieve very small interaxial distances, even with large bodies and lenses (with the down-sides mentioned previously of extra complexity, bulk and also the loss of one stop of light from each camera).
An interesting compromise between the complexities of dual 2D cameras and the limitations of integrated single-body 3D cameras are systems such as Silicon Imaging’s SI-2K camera with their SiliconDVR 3D software, (a camera we use extensively at Inition). The SI system comprises a single integrated recorder/body with two small individual heads that can be mounted on a mirror or side-by-side rig.
The advantages are a single interface to control both cameras (as if they were one), a single record location, no need for external genlock and timecode, and in-built 3D monitoring and playback. Rumours suggest the new Red Epic and Scarlet cameras may also provide 3D integration along similar lines and all moves in this direction would be welcome.
New creative rules
For those looking to move into 3D production, a thorough understanding of the technology needs to be combined with an appreciation that stereoscopy has a different set of creative rules to that of a conventional 2D shoot. Each step in the 3D production chain needs rethinking. There is much confusion and misunderstanding in the industry as people clamber to capitalise on the current 3D renaissance. Newcomers to 3D would do well to seek several opinions before making any decisions on the best techniques and technologies to employ.
Creative standards are improving. For example, it is generally accepted that 3D makes far more comfortable viewing if cutting between shots is reduced considerably compared to a typical 2D production, allowing viewers the time to take in the 3D scene. Also out of vogue is excessive out-of-screen effects and excessive in-to-screen 3D, which can cause eyestrain. Essentially, subtle — rather than ‘theme-park’ — 3D is the best way to avoid viewer fatigue for longform productions.
The 3D production industry is currently very technology- and R&D heavy. This can be intimidating for newcomers, especially non tech-savvy film-makers. As much as we’re excited by advances in camera technology, we’re also looking forward to the day when some of the talk of 3D rigs and technology makes way for more time to discuss the creative opportunities opening up with the advent of digital 3D cinema and domestic 3D TV.

